How to – Deploy NetApp ONTAP Select 9.4

Following my last post on What is NetApp ONTAP Select and when to use it today I’d like to share some details on the actual deployment and how easy it is.
There are still quite some recommended hardware specifications and also supported configs but overall most of it should be present anyway on most datacenters, even the branch ones.

In this post I will show how to deploy just a single node configuration. The good thing is that the whole deployment will be handled by a wizard driven tool so there is no need to understand the basic ONTAP deployment like disk assigning, intitialization…etc.
Crazy what happened since I started working with Data ONTAP 6 on a FAS250 back in 2004 šŸ˜‰

2018-11-26 17_55_55-Window

Read More »

What is NetApp ONTAP Select and when to use it

After a while I’m finally back with a new blog post. It’s been a crazy year so far with very little time to work on blogs. But now that the year comes to an end and the travel gets less I will share some posts with you on topics that I talked about most the last couple of months.

In this first post I’d like to talk a little bit about NetApp’s ONTAP Select solution as a lot of people don’t know yet that it even exists and what the use case might be. This post war written with ONTAP Select 9.4 GA data.

What is ONTAP Select?

If you look at NetApp’s website you will find the following description of what ONTAP Select is:
“NetAppĀ® ONTAPĀ® Select is a software-defined storage appliance that you can deploy on a variety of commodity hardware servers running the VMware ESXi and KVM hypervisors. ONTAP Select lets you quickly spin up storage resources in your data center, providing the agility you need to build a flexible and scalable private cloud infrastructure.”

Read More »

NetApp United – APPLY NOW

NetAppUnited_Crest_2_Black and White Version.png
For me it’s a real honor to be part of one of the best of not the best influence programs in IT industry – NetApp United.
Over the last years I had the pleasure to attend countless industry events and also became part of several influencer programs, meet IT subject matter experts and chat with other influencer in different programs.

Today I like to tell you a bit more about the NetApp United program. The information’s below can also be found on the official NetApp United team page.

The best thing is that you can apply till March 9th to become a member of the program here: APPLY NOW

The NetApp United program is for influencers who are curious about NetApp technologies and want an organized way to learn more.

Itā€™s a way for passionate technologists to stay engaged, receive exclusive access to NetApp information and experts, and share their knowledge, expertise, and thoughts across their personal channels, as well as NetApp channels.

We are looking for technology enthusiasts, NetApp Partners and Customers who:

  • Have a social media presence
  • Have overall expertise within the technology industry
  • Are a member of the technical community in good standing
  • Are interested in learning more about NetApp product and service

NetApp United Member Benefits:

  • Exclusive Access
    • As a NetApp United member, you will receive exclusive access to NetApp information and experts.
  • Engage and Get Your Voice Heard
    • Membership will provide you the opportunity to engage and get your voice heard through our corporate channels–included but not limited to social channels, blogs, video, podcasts, etc.
  • Expand your Network
    • Build relationships and connect with other NetApp United Members from around the world.

How are potential NetApp United candidates identified?
Potential candidates are identified in two ways:

  • Candidates can nominate themselves for consideration in the program using the link and I recommend you to: APPLY NOW
  • NetApp identifies and nominates potential candidates that meet the criteria outlined above.

How long does the NetApp United Program membership last?
Once selected, membership lasts for one year. Membership confirmation is announced on or around March 31st of each year. At the end of the year, members can choose to continue by reapplying or end their membership. Additional opportunities to join the NetApp A-Team are also available if A-Team criteria has been met.

What are the requirements for maintaining NetApp United membership?
NetApp United members are encouraged to stay engaged in the program through activities such as, but not limited to:

  • Contributing NetApp or industry expertise through blog posts, social channels, etc.
  • Engaging and attending exclusive NetApp events, sessions, webinars, and more
  • As the program evolves, engagement opportunities will evolve as well

Have additional questions?
Please feel free to contact us at ng-NetAppUnited@netapp.com.

How to: NetApp ONTAP reverse SnapMirror (CDOT)

I recently researched the ONTAP functionality to reverse a SnapMirror and as I didn’t found any useful blog post or even user guide explaining how to perform it on CLI I thought it’s worth to share on my own blog. In this post you will see two ONTAP systems where CDOT01 is the primary and CDOT02 is the secondary. My source volume here is called “datalunwindows” on the source SVM “SVMSRC” and my destination volume is named “SVMSRC_datalunwindows_mirror” on the destionation SVM “SVMDST”. Everything was tested with ONTAP 9.2.

What means reverse SnapMirror?
By that I mean changing the direction of the SnapMirror. The most likely best example is if you want to failback from a secondary ONTAP to the primary after a disaster.

Normal replication:
CDOT01/volumesource -> CDOT02/volumesdestination
Needed replication after a disaster:
CDOT02/volumesdestination -> CDOT01/volumesource

The change includes different steps an pre-requirements such as a broken SnapMirror relationship and that the source volume is still available and not completely lost. If you primary system is completeley lost you need to re-initialize to a new volume/system.

How do I perfrom a reverse SnapMirror?
The first and maybe easiest way would be to use the system manager as the latest version have the option to reverse a SnapMirror. But in my case I was looking for the way to do it on CLI as I was building some scripting around it.

1. Make sure your SnapMirror from CDOT01 to CDOT02 is broken and your data on CDOT02 is online.

##Check if mirror is broken
snapmirror show -destination-path SVMDST:SVMSRC_datalunwindows_mirror -fields state
##Check if volume is now in RW status (DP before)
volume show -volume SVMSRC_datalunwindows_mirror -fields type
##Check if volume is now online
volume show -volume SVMSRC_datalunwindows_mirror -fields status

2. Be aware that changing the direction will overwrite the current source data on the volume so don’t execute the commands without knowing what you do. To sucessfully execute a reverse, there needs to be at least one common Snapshot on the source and destionation volume which will be used as the baseline Snapshot. If there is no common Snapshot the command will fail.

3. Execute the resync command on the source ONTAP (CDOT01) to get data from the secondary. Yes you see right, the reverse is simply done by using the rescny command but on the source (new destionation) instead of the destionation (now source).

snapmirror resync -destination-path SVMSRC:datalunwindows -source-path SVMDST:SVMSRC_datalunwindows_mirror -force true

4. Check if the SnapMirror is now reversed. You should see that CDOT01 now has an active SnapMirror relation and CDOT02 is a source.

On CDOT01

snapmirror show

On CDOT02

snapmirror list-destinations

5. The reverse is already done now.
Optional: Ususally customers now want to make the source the primary now again and reverse the SnapMirror again to have the initial CDOT01->CDOT02 relation in place again. Therefore follow the steps below:

##Quiesce the relation on the source cluster (CDOT01)
snapmirror quiesce -destination-path SVMSRC:datalunwindows

##Break the snapmirror on the source cluster (CDOT01)
snapmirror break -destination-path SVMSRC:datalunwindows

##Mount the data back to your environment

##Resync the relation back from CDOT01 to CDOT02
snapmirror resync -destination-path SVMDST:SVMSRC_datalunwindows_mirror -source-path SVMSRC:datalunwindows -force true

##Cleanup the Snapmirror resync on source CDOT01
snapmirror delete -destination-path SVMSRC:datalunwindows

##Cleanup the Snapmirror resync on destination CDOT02
snapmirror release -destination-path SVMSRC:datalunwindows -force true


That’s it for this post. I hope it was useful for some of you. Feel free to comment or share on any channel.

See u next time.

Cisco CCNA – Full Lab Guide for your exam by Flackbox

Today I want to make sure you don’t miss the chance to get a free Cisco CCNA Lab Guide to pass the latest 200-125 CCNA and 100-105 & 200-105 ICND exams.

One of my blog colleagues Neil Anderson (flackbox.com) spend a lot of time to put together a 350 page gudie that helps you to pass the exams and understanding the content. The guide contains:
– The IOS Operating System
– The Life of a Packet
– The Cisco Troubleshooting Methodology
– Cisco Router and Switch Basics
– Cisco Device Management
– Routing Fundamentals
– Dynamic Routing Protocols
– … and much more

To get started and for more information’s click on the image below to reach his website.

Well done Neil.

cisco.png

Cisco HyperFlex integration details and Q&A

With Veeam Backup & Replication 9.5 Update 2 we launched our integration with Cisco HyperFlex. The integration leverages our Backup from Storage Snapshot technology to optimize the data transfer for Veeam backups as well as replications. Since then I got a lot of positive feedback and questions around the integration. Thatā€™s why I want to answer the most common questions in this blog post. A brief overview on the integration itself was already done by my colleague Michael Cade earlier this year.

Besides this blog post we already started the work on an implementation and best practice guide so stay tuned and check our website regularly.

Why does Veeam integrate into Cisco HyperFlex?

The main reason why Veeam started to integrate into storage arrays, regardless if it is Cisco HyperFlex or any other storage we support, is to avoid or at least minimize the time of VMware Redo-Log Snapshots (native VMware VM Snapshots).

If you run a VM backup without the integration, the workflow will always create a VMware Redo-Log Snapshot; Veeam will read all data while VMware redirects all writes into the Redo-Log File and after the backup/replica is done, the VM Snapshot will be deleted as shown in the graphic below on the left side. Especially the VM snapshot delete can take a lot of time and consume serious amounts of storage resources until done.

Cisco HyperFlex integration

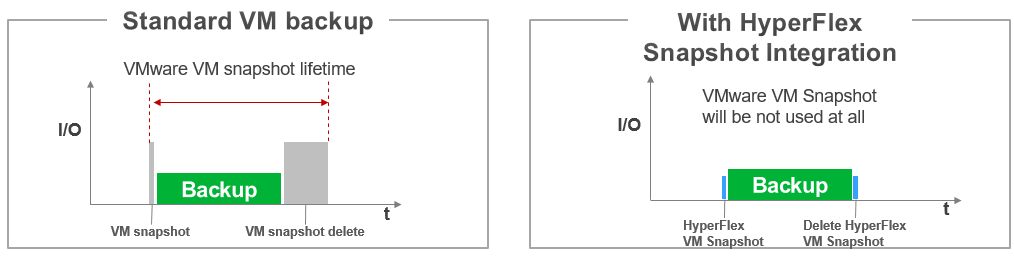
Using the Cisco HyperFlex integration means avoiding VMware VM Snapshots completely. As you can see on the right side in the graphic above, the workflow will create a Cisco HX Snapshot; Veeam reads all data out of the Snapshots and after the backup/replica is done Cisco will delete the HX Snapshot which has almost no impact in the VM or the rest of the production.

With that the Veeam integration into Cisco HyperFlex is the only one where no more VMware Snapshots are needed at all.

What are the requirements and which Veeam features can be leveraged with Cisco HyperFlex?
Before going ahead and trying the integration please be aware of the following requirements. 50% of the questions and errors I get are due to the fact that at least one of the following requirements is missing:

  • VMs reside on a Cisco HyperFlex 2.0 or newer cluster (HX version < 2.0 are not supported)
  • Veeam Backup & Replication 9.5 Update 2 or newer is installed on the backup server
  • License for Veeam Backup & Replication Enterprise Plus Edition is installed on the backup server
  • Cisco HyperFlex storage system is added to the Veeam storage infrastructure and the vCenter server is added to virtual infrastructure
  • Backup proxy is properly configured in the backup infrastructure
  • VM must not have any existing VMware native Snapshot before the first job kicks off
  • The ā€œEnable backup from storage snapshotsā€ option is selected in the job settings
  • When using Backup from Storage Snapshot over NFS:
    • Veeam Proxy server has access to the Cisco HyperFlex NFS Backend
    • Required VMware Firewall Ports are open for IOVisor Backup (see Helpcenter article)

As of today Veeam supports Backup from Storage Snapshots with Cisco HyperFlex. All other storage related features like Veeam Explorer for Storage Snapshots, OnDemand Sandbox from Storage Snapshots, Snapshot only jobā€¦etc. are not supported. Of course, you can use all regular Veeam features leveraging the Veeam backup.

How do I configure the Cisco HyperFlex integration?

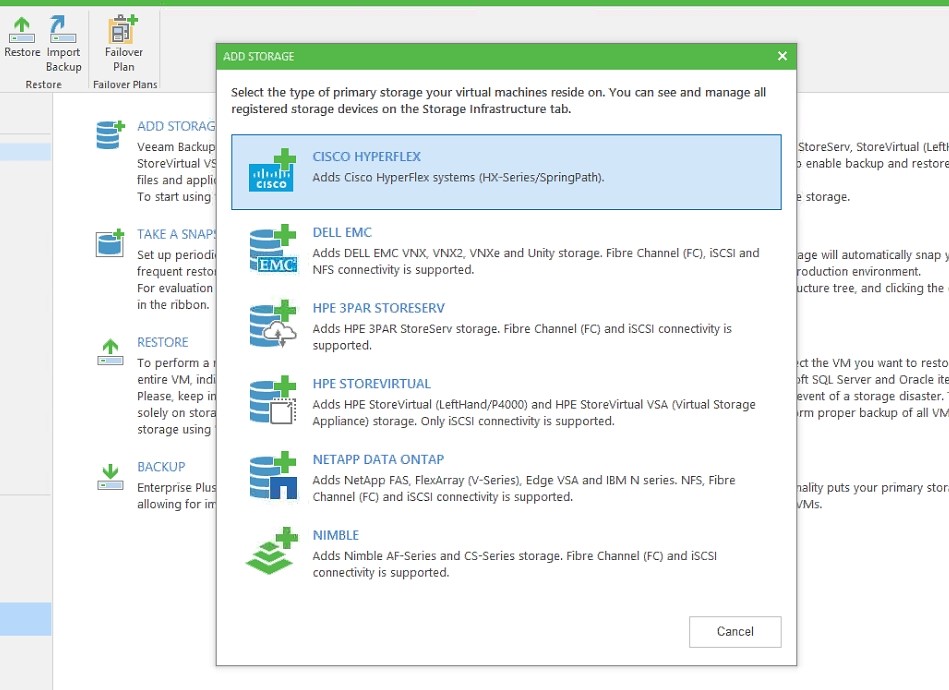
The Cisco HyperFlex integration is like any other Veeam Storage Integration. For us Cisco HyperFlex is not a HyperConverged system but seen as a storage system. Thatā€™s why you need to navigate to ā€œStorage Infrastructureā€ within your Veeam Backup & Replication installation to add the Cisco HyperFlex system. After selecting ā€œAdd Storageā€ you will be promoted with the following wizard:

1. Select ā€œCisco HyperFlexā€

Cisco HyperFlex integration

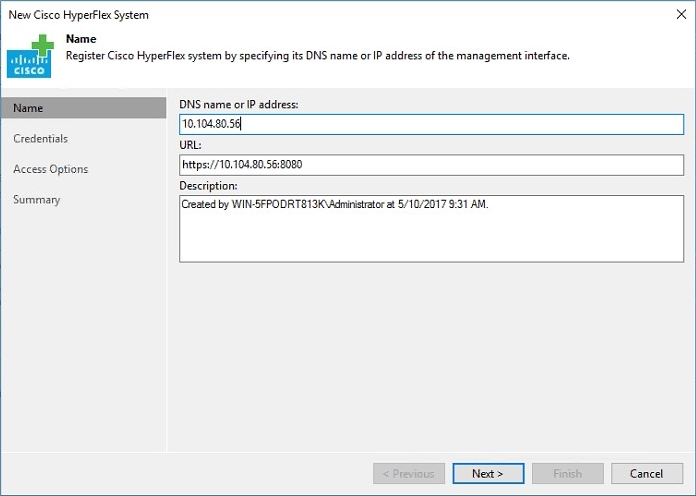
2. Add the Cisco HyperFlex Management IP address of the Data Platform

Cisco HyperFlex integration

a) To find the needed IP address simply open the advanced Cisco HX settings within your VMware Webclient

Cisco HyperFlex integration

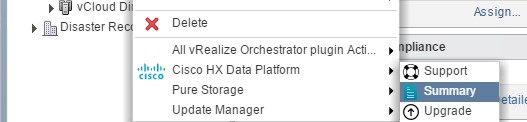
b) The needed IP can be found here

Cisco HyperFlex integration

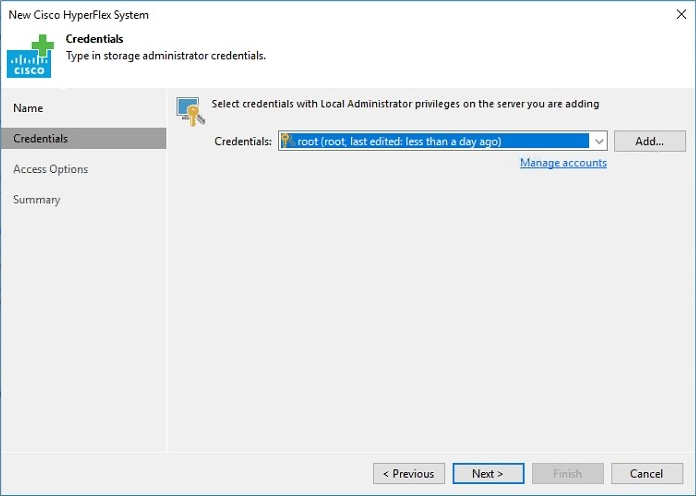
3. Define the login credentials for the management

Cisco HyperFlex integration

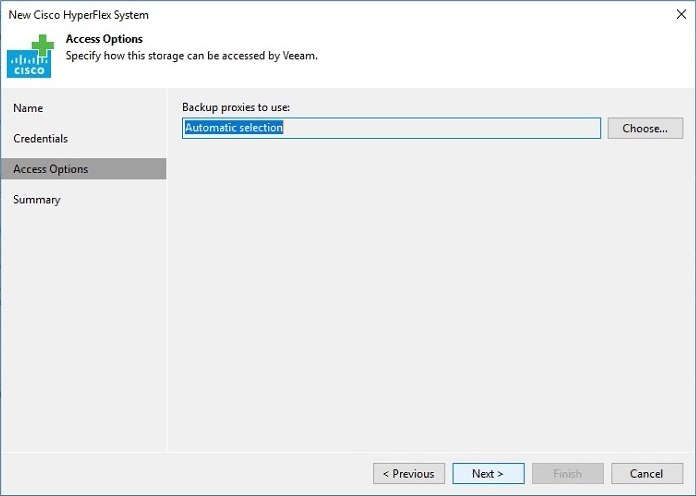
4. Optional: Define Veeam Proxies to be used for this cluster

Cisco HyperFlex integration

5. Finish the wizard

Cisco HyperFlex integration

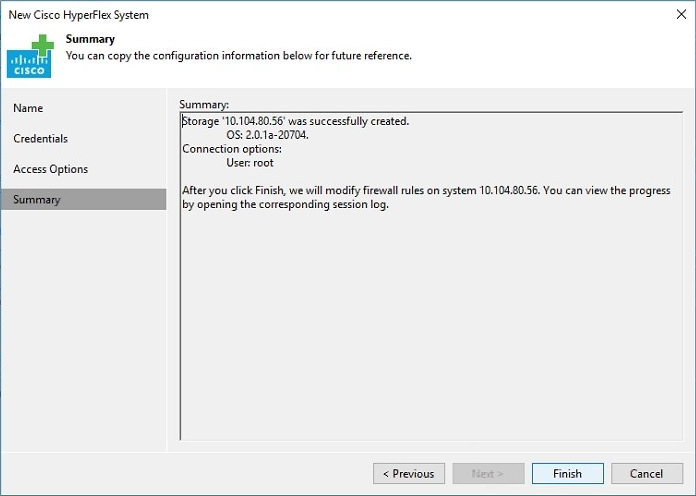
After finishing the wizard, you will see the following dialog that adds the Cisco HyperFlex system to the Veeam installation.

Cisco HyperFlex integration

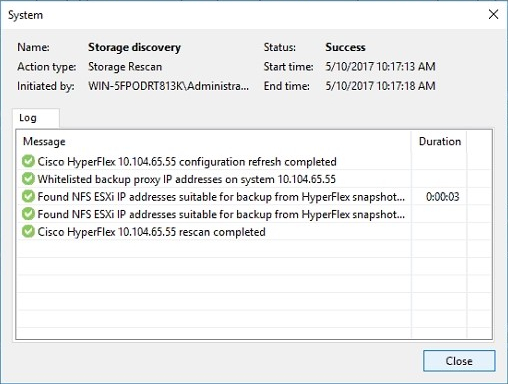
If you see any warning message here the reason is most likely that your Veeam proxy server doesnā€™t have the needed backend NFS data access or the VMware Firewall ports are not opened. More details in the next questions.

What access is needed on the Veeam Proxy to get Backup from Storage Snapshots working?

The Veeam integration with Cisco HyperFlex works with all available data transport modes.

Cisco HyperFlex integration

No matter if you use NFS (1, 2) as the transport protocol by accessing the backend Cisco HyperFlex data network or if you use the regular transport modes Hot-Add (3) and NBD (4), Veeam will always leverage a Cisco HyperFlex Snapshot as a source.

For NBD and Hot-Add, no additional configuration is needed. After the Cisco HX system is added to the Veeam installation Cisco HX snapshots will be automatically used.

For NFS as transport mode there are two ways to access the data:

  • Backup from Storage Snapshots over IO Visor on ESX(i) hosts (1): The IO Visor is a Cisco HyperFlex software module that runs on every ESXi host that is part of the Cisco HyperFlex cluster. It presents HyperFlex NFS datastores to the ESX(i) hosts and optimizes the data paths in the HyperFlex cluster. The backup over IO Visor is the preferred method as it provides the high speed of VM data reading and balances the load across the HyperFlex cluster.
  • Backup from Storage Snapshots over HyperFlex Controller Cluster IP (2): In this processing mode, all traffic is handled by a single HX controller that holds the HyperFlex Controller Cluster IP.

Cisco HyperFlex integration

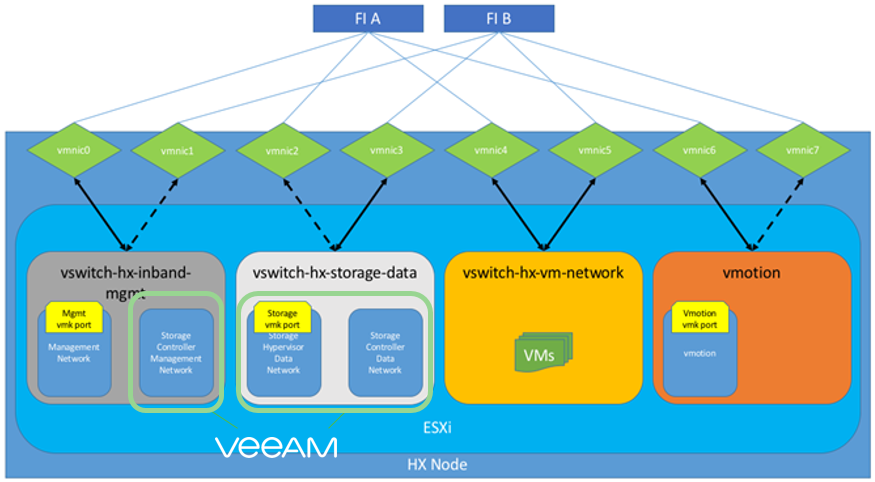
No matter which NFS mode you use, the Veeam Proxy will need access to the backend NFS data network of Cisco HX. The graphic above shows which networks are accessed by the Veeam proxy server. Iā€™m used to saying, configure your Veeam proxy server with the same management and storage access like what you would do with an additional ESXi host.

The HyperFlex Controller Cluster IP does not require any additional confirmation as all needed communication will be handled by Veeam and Cisco APIs.

For the IOVisior backup you need to open specific VMware Firewall ports as the Veeam proxy server needs to access a module running within the VMware ESXi. Information on how to open the needed ports is listed in the next question.

How do I open the needed VMware Firewall Ports?

The Cisco HyperFlex IO Visor is a software component that runs on all ESXi hosts within a Cisco HyperFlex cluster. It works as an NFS server for Veeam traffic.

You need to allow NFS traffic from the backup proxies to ESXi hosts. As Cisco IO Visor based NFS communication uses dynamic ports, you need to create an ESXi firewall rule with inbound ports 0-65535 and the backup proxy IP addresses as allowed IP addresses.

You can do this in three ways:

  • Create a VMware ESXi host VIB host extension file that creates the firewall rule, install/enable it on all hosts and set the backup proxy IP addresses as allowed ones. For more information, see KB article 2291.
  • Use a predefined VMware ESXi host extension VIB file from the Veeam Community GitHUB project. For more information, see KB article 2298.
  • Use ESXi command line interface to create a temporary firewall rule (until the next ESXi host reboot). For more information, see KB article 2299.

Conclusion

As you can see the integration is very powerful and there are a lot of details when it comes down to the configuration. Veeam Backup & Replication 9.5 Update 2 offers Availability for Cisco HyperFlex 2.0 by providing both an optimized backup and replication workflow to lower the recovery time and point objectives (RTPO) to < 15 minutes for ALL applications and data running on top of it.

Here are some useful links, including our newly released Cisco Validated Designs:

How to: Upgrade NetApp ONTAP Simulator 9.1 to 9.2

For my tests and lab activities it’s always important to work with the latest version of software products. As the NetApp ONTAP simulator usually comes some times after the GA I decided to upgrade the simulator with the regular GA package and want to share here how to do it.

Before you start you need to:
– download the latest ONTAP 9.2 build
– make sure your root aggregate and root volume has enough free space
– disable snapshot scheduling and reserve on vol0 (yes, the vol0 on the node)
– The guide is for a single-node simulator

Read More »

Synology 1517+: Initial setup

As my Homelab is growing and the data explodes it was time to replace my private NAS system with a new one. As my current one, a Synology DS213j, works since 3 years without any problem it was clear for me to look at Synology again. I love the features they offer esp. the Cloud Station and the Surveillance Station as well as the multi-protocol support are key for me in my lab. And as they recently added their own Virtualization layer called “Virtual DSM” it was also clear that I will go for a model supporting it. After some research the decision was made that the new one will be the DS1517+, Synology’s new 5-bay flagship. As disks I’m using the Seagate IronWolf 4TB NAS disks. FYI, the screenshots are a mix of english one (from Synology guides) and german ones (as my system is installed in german language, not translated).

This blog post is the first of a new series showing you the initial as well as some advanced setup of the Synology. The planned posts are:
1. Initial setup – this post
2. Disk, Volume and Network Configuration
3. User, Folder/Share Configuration
4. CloudStation Configuration
5. Surveillance Station
6. A first look into Virtual DSM
Read More »